And welcome to Tomme's Boringe Pyrate Logbooke where I shall give a little insight on the latest project that I have done for Capt'n Cianty.
The goal
Make a crew of 20 scurvy sea dogs (including 3 not so scurvy but nonetheless cute monkeys) ready to set sail and conquer some booty, that the Capt'n can be proud of!
The Logbooke
by Tom
by Tom
Part One - Preparations
Gathering the men
First things first! Three of the pirates had been treated rather roughly by the trip via post and arrived with their sword arms broken off. Before I can start painting I need to make sure all miniatures are durably assembled (on these miniatures all zones remained accessible even after assembly) to avoid bad surprises during painting and transport. I decided not only to glue them back on - that would have been good enough for a sprog but not for a hardened seafaring pirate! - but to "bolt" them back on. That way chances are the miniatures will have a better return journey and arrive in one piece.
 The idea is simple. Drill 2 holes, one in the arm "socket" and one in the hand. The metal pin is nothing more than a piece from a paper clip. With a little routine and if you drill carefully, the miniature has a rock solid new part in 5 minutes. I don't usually assemble a metal model without "bolting" all glueable parts. Arms and legs breaking off during painting or during subsequent games are a (dreadful) thing of the past.
Sweeping the deck
In other words, the bases. I chose to base all the miniatures after basecoating because they were supposed to stand on sand (to mix better with Cianty's gaming board) and the drybrushing process is unprecise. It is thus inevitable that some colour gets on the legs and boots. So it is best to paint the actual miniature only once the bases are ready.
 1. Fill gaps with greenstuff and basecoat.
 2. Sand the base with PVA glue.
I used modelling sand almost identical to the one GW used to sell (still sells?). It can be bought at half the GW price in any train modelling shop. I chose this sand because it is a little coarser than "beach sand" and thus allows for a more contrasting drybrush effect without resembling gravel.
 3. Base and Drybrush!
I first coated the entire base with watered down Vallejo Tierra Mate (Flat Earth). Then I applied a heavy Vallejo Maron Dorado (Gold Brown) followed by Vallejo Amarillo Arena (Sand Yellow). I finished with a light drybrush of Vallejo Arena Oscura (Dark Sand). Rinse brush & repeat 20 times, once on each model.
For those of you suffering from GW paints:
Vallejo Tierra Mate ~ Bestial Brown
Vallejo Maron Dorado ~ Bubonic Brown
Vallejo Amarillo Arena ~ Bubonic Brown + Bleached Bone
Vallejo Arena Oscura ~ Bleached Bone

"Kleider machen Leute"
So I decided to go for:
- Red and Blue for the heroes (Davey, McBride, Jim Jones and Diamond Joe)
- Green for the "Cutthroats" (Pirates 1)
- Blueish/Beige as the additional colours and the rest of the henchmen (Rogues, Rogues 2).
The clothes had to clearly show the difference between the crew members. The difference between a henchman with torn trousers and naked torso and the captain are pretty obvious, but this is not true for all the "coat wearing" pirates. The difference between a "Cutthroat" (see LotHS rules) and a hero for instance is not so clear for the layman. Hence the need for different colours.
Here Cianty gave me total freedom in the choice of colours, but emphasized that he liked the colours of Adam Clarke's original display models (see Black Scorpion website). After a lot of thinking I decided to go with similar colours as the Black Scorpion minis. I usually am a fervent defender of unique colour schemes and normally obsessive about painting my miniatures in a different way than the "official" ones, to underline that they are MINE. But here, the simple and effective choice of colours Adam had chosen were very tempting. Furthermore any attempt to choose different ones would mean running the risk of displeasing the Capt'n and walking the plank... figuratively speaking, of course ;)
Here Cianty gave me total freedom in the choice of colours, but emphasized that he liked the colours of Adam Clarke's original display models (see Black Scorpion website). After a lot of thinking I decided to go with similar colours as the Black Scorpion minis. I usually am a fervent defender of unique colour schemes and normally obsessive about painting my miniatures in a different way than the "official" ones, to underline that they are MINE. But here, the simple and effective choice of colours Adam had chosen were very tempting. Furthermore any attempt to choose different ones would mean running the risk of displeasing the Capt'n and walking the plank... figuratively speaking, of course ;)
So I decided to go for:
- Red and Blue for the heroes (Davey, McBride, Jim Jones and Diamond Joe)
- Green for the "Cutthroats" (Pirates 1)
- Blueish/Beige as the additional colours and the rest of the henchmen (Rogues, Rogues 2).
 Mad Jim Jones' coat (red) was painted as follows:
1. Base of GW Blood Red with Vallejo Black
2. Progressive highlighting with increasing amounts of Blood Red.

 A WIP shot of the red coats.
 A finished "Red Coat"
 The finished Mad Jim Jones

 Red and blue coats. Left to right: I call him "Spyglass Pete" (Hero), the "fat guy" (also a Hero), Mad Jim Jones (Hero) and Captain Redbeard (guess...)
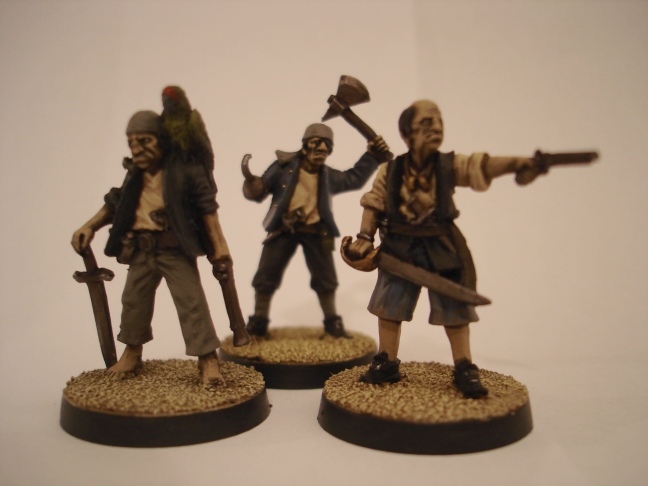
 A group of rogues. I wanted the henchmen to lack flashy colours so that the heroes would stand out compared to them on the battlefie... sorry, ON THE SHIP'S DECK! YARRRR! So I kept the tones to grey, beige, dark blue and brown.
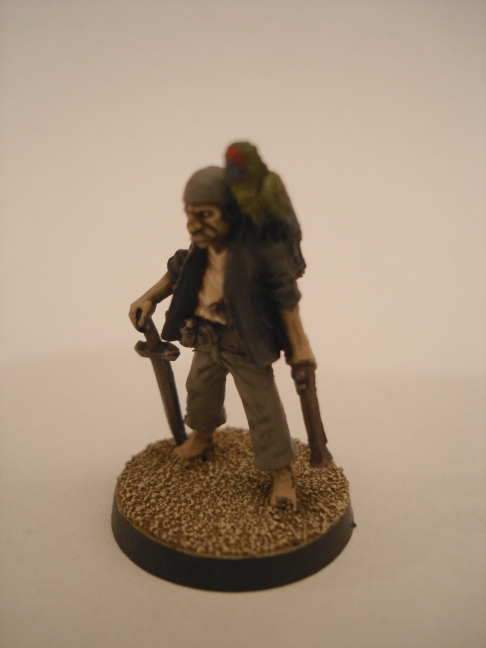
 A WIP progress shot of the shirt.
I painted all the uncolored cloth parts (mainly shirts) in beige. For this is started with a 2:1 mix Vallejo Tierra Mate + Vallejo Arena Oscura. Then I progressively added Arena Oscura until reaching pure Arena Oscura for the final highlight step. The tricky part about painting whites/beiges is to make sure the shadings are VERY "flat". That means that you start with a base that is pretty close to your final result. This way you avoid dramatic jumps in shade (which look great on reds for instance but not so much on whites). The trick is to be rather careful and go easy when adding beige to your mix.
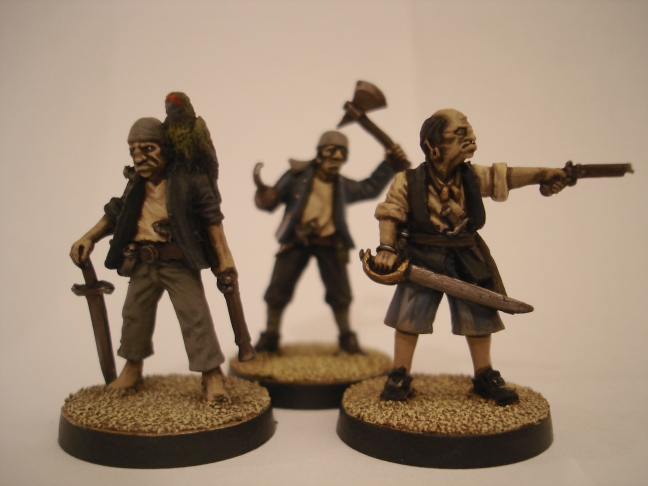 The henchman on the left is a good example of "flat" shading when you look at his shirt.
The henchman on the left is a good example of "flat" shading when you look at his shirt. WIP: The trousers
 The trousers require a little more dedication. I wanted to have something in addition to the homogenous coloured surfaces red, green and blue, that underlined the piraty nature of these fellows.
The beige and blue stripes actually have the same base: I made a mix of GW Astronomican Grey (Foundation Paint) and GW Shadow Grey. I added a few drops of black because I felt it was too blue. It is important to make enough and spread the mix a little on the palette so that you can use this same mix twice for shading.
 I shaded the whole trousers as normal using the base mix and by adding little amounts of GW Astronomican Grey. Half-way through the shading I switched to doing the blue stripes (* see later why). For this I used the same base mix but added little amounts of GW Shadow Grey at each shading step. Once the blue stripes are finished the white stripes are picked out a little more by carrying on with GW Astronomican Grey + a little bit of white.
* Why not paint all the white stripes and then all the blue stripes instead of "hopping around"?
Well, I found that although this may sound a little complicated, it makes it much easier to:
1. create contrast between the stripes by leaving a very thin line of "dark blue" between the blue and the white stripes. This easier to achieve with the lighter layer: in this case white rather than blue.
2. To set the highlights right for either colour, because you already have a partially shaded piece of minatures that only needs a little more coherent highlighting. Since folds in the trousers "cut" through white and blue stripes alike, it can be tricky to "extend" a highlight along a fold when you need to "change" the colour. The task gets much easier if there is a partially shaded base there.
3. It makes the trickiest part easier too: placing the stripes in (optically!!!) equidistant intervals.
Ebony
Two crew members are of African origin. Here you can see WIP shots of the skin.
Painting black skin is actually much easier than painting it's white counterpart: I started by basing all the skin parts with a 1:1 mix of Vallejo Alemán Cam. Pardo Medio (but Vallejo Marrón Cuero also does the trick) and black. Then I gradually highlighted until reaching pure Vallejo Alemán Cam. Pardo Medio.
Painting black skin is actually much easier than painting it's white counterpart: I started by basing all the skin parts with a 1:1 mix of Vallejo Alemán Cam. Pardo Medio (but Vallejo Marrón Cuero also does the trick) and black. Then I gradually highlighted until reaching pure Vallejo Alemán Cam. Pardo Medio.


I decided to experiment a little with the other black pirate (not shown), and tried to give his skin a more brown/reddish teint, for the sake of variety. So the other guy got a base of a triple mix 1:1:1 of Vallejo Alemán Cam. Pardo Medio + Vallejo Tierra Mate + Black. From there the idea was the same as described above: I highlighted by adding little amounts of Vallejo Tierra Mate to the previous mix at each highlighting step. I stopped when I felt the skin had the right colour for my taste.
Stay tuned for more paintjobs when we talk about painting faces next time! See you soon guys!
Tom
Hi Tom
ReplyDeleteLove the painting style, just the right mood for pirates.
May I ask what is the make of the modelling sand you use. I have run out of the GW sand and have hunted in vain for something to replace it. Many thanks.
Pat
Hi Pat!
ReplyDeleteI'm afraid I don't have the original bag anymore but I am pretty sure it was "Extra Fine Brown Granite Chippings JXGSTBR" by Javis.
Check out this link:
http://www.cheshiremodels.co.uk/acatalog/Scatters.html
I hope that helps!
Good luck
Tom
Many Thanks Tom. I'll give it a try.
ReplyDeletePat